Hardhat の使い方: 初心者向けの Solidity 開発入門
Jun 19, 2022このページはこんな人におすすめ
- Solidity を学習したい
- テストネットやメインネットにスマートコントラクトを作りたい
- Hardhat の使い方を知りたい
Hardhat は 2022 年現在、Solidity エンジニアの間でもっともよく使われている開発ツールの1つです。
Hardhat 以外によく使われるツールとしては Truffle があります。 Hardhat の方が新しくビルドやテストでより使いやすくなっています。
このページでは、Hardhat のチュートリアルを日本語で解説しています。 チュートリアルの中からテストネットでの実行に必要な部分を抜粋しています。
このページで実際に使ったソースコードはGitHubからダウンロードできます。
インストール
Hardhat の Document にしたがいインストールを進めます。
https://hardhat.org/tutorial/setting-up-the-environment.html
Hardhat を使うには、Nodejs のパッケージマネージャ npm を使います。
Hardhat はプロジェクトごとにインストールするので、この時点では PC のターミナルで npm コマンドを実行できれば環境構築は完了です。
Hardhat プロジェクトの作成
hardhat-tutorial という npm 用のプロジェクトを作り、hardhat をインストールします。
mkdir hardhat-tutorial
cd hardhat-tutorial
npm init --yes
npm install --save-dev hardhat
新しいプロジェクトに Hardhat をインストールできました。 hardhat コマンドを実行して、hardhat の設定ファイルを作ります。
npx hardhatnpx というコマンドは npm によってインストールしたコマンドを実行するためのコマンドです。 npm でインストールしたコマンドをそのまま入力しても見つけられないので npx を使います。
選択肢が表示されたら、Create an empty hardhat.config.jsを選びます。
? What do you want to do? …
  Create a sample project
❯ Create an empty hardhat.config.js
  Quit
プロジェクトディレクトリに Hardhat の設定ファイルhardhat.config.jsが作られます。
Create a sample projectを選択すれば、このあとの作業をもっと簡単にすすめることができます。
ここではプロジェクトの構成を理解するために、1 つ 1 つ自分で作っていきましょう。
プラグインの追加
ether.js や waffle といった Hardhat のプラグインを追加します。
npm install --save-dev @nomiclabs/hardhat-ethers ethers @nomiclabs/hardhat-waffle ethereum-waffle chaiスマートコントラクトの作成
コーディング
hardhat.config.js を以下のように編集します。
hardhat.config.js
require("@nomiclabs/hardhat-waffle");

/**
 * @type import('hardhat/config').HardhatUserConfig
 */
module.exports = {
  solidity: "0.7.3",
};
執筆時点での Hardhat のドキュメントのコードをそのまま使っています。 Solidity のバージョンが少し古いので、バージョン番号は適宜更新してください。
プロジェクトに contracts というディレクトリを作りましょう。 contracts ディレクトリの中に Token.sol というファイルを作り、下のコードを書きます。
contracts/Token.sol
// Solidity files have to start with this pragma.
// It will be used by the Solidity compiler to validate its version.
pragma solidity ^0.7.0;


// This is the main building block for smart contracts.
contract Token {
    // Some string type variables to identify the token.
    // The `public` modifier makes a variable readable from outside the contract.
    string public name = "My Hardhat Token";
    string public symbol = "MHT";

    // The fixed amount of tokens stored in an unsigned integer type variable.
    uint256 public totalSupply = 1000000;

    // An address type variable is used to store ethereum accounts.
    address public owner;

    // A mapping is a key/value map. Here we store each account balance.
    mapping(address => uint256) balances;

    /**
     * Contract initialization.
     *
     * The `constructor` is executed only once when the contract is created.
     */
    constructor() {
        // The totalSupply is assigned to transaction sender, which is the account
        // that is deploying the contract.
        balances[msg.sender] = totalSupply;
        owner = msg.sender;
    }

    /**
     * A function to transfer tokens.
     *
     * The `external` modifier makes a function *only* callable from outside
     * the contract.
     */
    function transfer(address to, uint256 amount) external {
        // Check if the transaction sender has enough tokens.
        // If `require`'s first argument evaluates to `false` then the
        // transaction will revert.
        require(balances[msg.sender] >= amount, "Not enough tokens");

        // Transfer the amount.
        balances[msg.sender] -= amount;
        balances[to] += amount;
    }

    /**
     * Read only function to retrieve the token balance of a given account.
     *
     * The `view` modifier indicates that it doesn't modify the contract's
     * state, which allows us to call it without executing a transaction.
     */
    function balanceOf(address account) external view returns (uint256) {
        return balances[account];
    }
}
コンパイル
hardhat コマンドを実行します。
npx hardhat compile出力
Downloading compiler 0.7.3
Compiling 1 file with 0.7.3
contracts/Token.sol: Warning: SPDX license identifier not provided in source file. Before publishing, consider adding a comment containing "SPDX-License-Identifier: <SPDX-License>" to each source file. Use "SPDX-License-Identifier: UNLICENSED" for non-open-source code. Please see https://spdx.org for more information.
Compilation finished successfully
テスト
プロジェクトの直下に test というディレクトリを作ります。 test ディレクトリの中に Token.js というファイルを作り、以下のコードを書きます。
test/Token.js
const { expect } = require("chai");

describe("Token contract", function () {
  it("Deployment should assign the total supply of tokens to the owner", async function () {
    const [owner] = await ethers.getSigners();

    const Token = await ethers.getContractFactory("Token");

    const hardhatToken = await Token.deploy();

    const ownerBalance = await hardhatToken.balanceOf(owner.address);
    expect(await hardhatToken.totalSupply()).to.equal(ownerBalance);
  });
});
コンパイル済みのスマートコントラクトに対して上のテストコードを使ってテストを実行します。
npx hardhat test Token contract
✓ Deployment should assign the total supply of tokens to the owner (565ms)
1 passing (569ms)テストネットへのデプロイ
Ethereum のテストネットにデプロイする方法はこちらをどうぞ
Hardhat の使い方: Ethereum のテストネットにデプロイしよう!
scripts/deploy.js
デプロイ用のスクリプトを用意します。
async function main() {
  const [deployer] = await ethers.getSigners();

  console.log("Deploying contracts with the account:", deployer.address);

  console.log("Account balance:", (await deployer.getBalance()).toString());

  const Token = await ethers.getContractFactory("Token");
  const token = await Token.deploy();

  console.log("Token address:", token.address);
}

main()
  .then(() => process.exit(0))
  .catch((error) => {
    console.error(error);
    process.exit(1);
  });
hardhat.config.js
hardhat.config.js を書き換えます。
require("@nomiclabs/hardhat-waffle");

const ROPSTEN_PRIVATE_KEY = process.env.ROPSTEN_PRIVATE_KEY;
const ROPSTEN_RPC_URL = process.env.ROPSTEN_RPC_URL;

module.exports = {
  solidity: "0.7.3",
  networks: {
    ropsten: {
      url: `${ROPSTEN_RPC_URL}`,
      accounts: [`${ROPSTEN_PRIVATE_KEY}`],
    },
  },
};
Ropsten にデプロイ
npx hardhat run scripts/deploy.js --network ropstenDeploying contracts with the account: 0x470815ee5b366755284C9e85f0D636F1e046d013
Account balance: 1288845007486614009
Token address: 0xfa9D0729c104841668E0DDeb433Cbc6107AB59C1このようなログが表示されたらテストネットへのデプロイが正常に実行されています。
Etherscan(Ropsten)でコントラクトアドレスやトランザクションを確認してみましょう。
https://ropsten.etherscan.io/address/0xfa9D0729c104841668E0DDeb433Cbc6107AB59C1
Metamask で確認
Hardhat のチュートリアルには載っていませんが、せっかくトークンを作ったので Metamask に登録してみましょう。
deploy.js を実行した際に出力されたToken addressを Metamask に登録します。
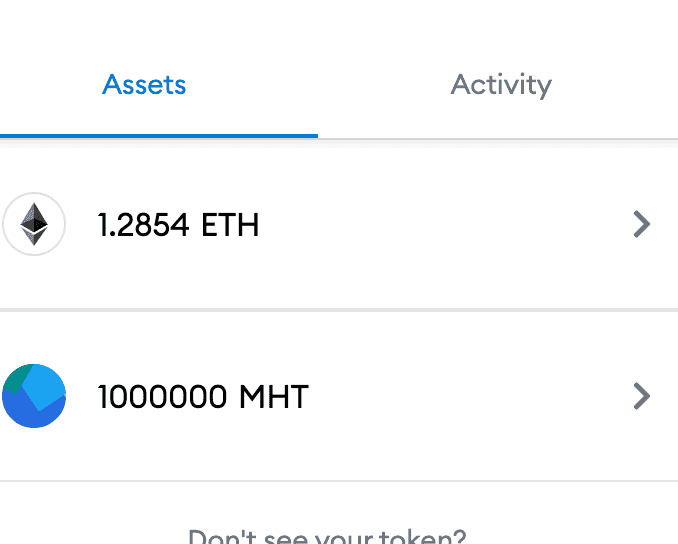
これで 1,000,000 MHT が見えるようになります。
これは Token.sol というサンプルコードであなたが作った’My Hardhat Token’です。
ほかのアドレスに送ることもできます。自由に試してください。
メインネット用の ETH と RPC を使えば同じやり方でメインネットにデプロイすることもできます。